Follow the steps given below to find your
computer IP address on Windows 10:
1. Type “cmd ” in the search bar and open the command prompt.
2. Type “ipconfig” and hit enter.
This website helps enthusiastic aspirants with basics of many coding languages which will help them in career as software developers. This website also helps them to explore different software editors which help them enhance their knowledge in the field of graphic designing ,visual effects , etc. Provide free notes for various topics and download links.
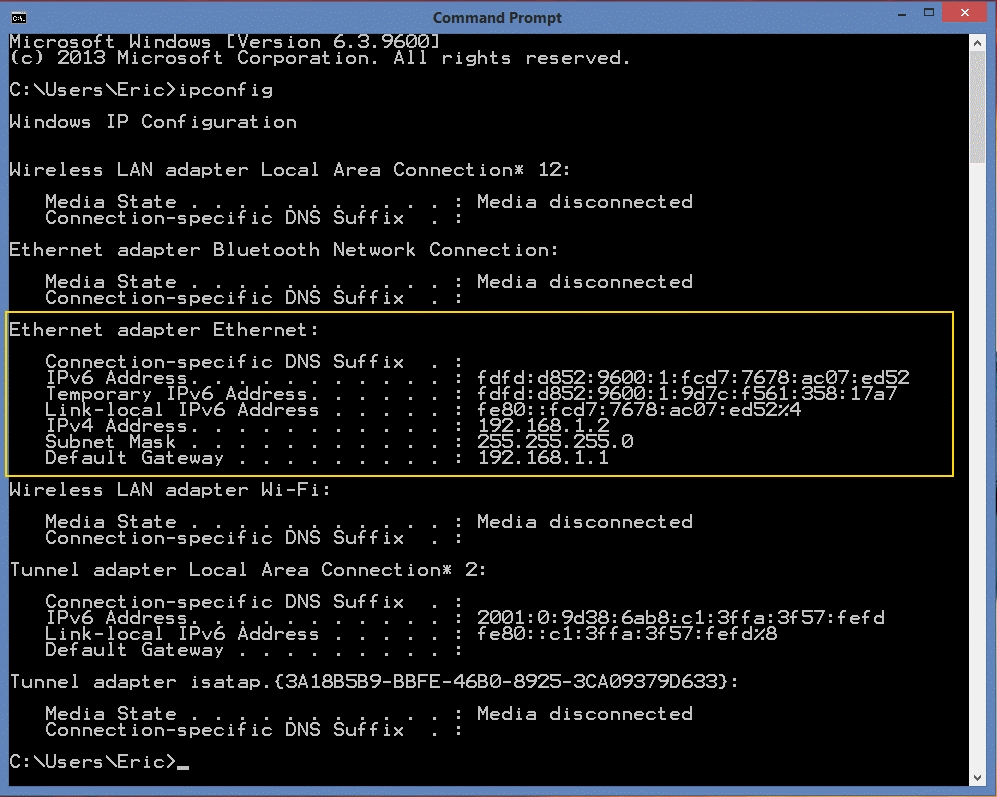
Follow the steps given below to find your
computer IP address on Windows 10:
1. Type “cmd ” in the search bar and open the command prompt.
2. Type “ipconfig” and hit enter.
Step 1: Click on the Windows logo in the bottom left corner of your
computer screen
Step 2: After clicking on the Windows logo, you will see a gear-shaped
icon on the left side of your screen. Click on it to open the settings
of your computer.
Step 3: After opening the all settings window, click on the Time &
Language option.
Step 4: On the left side, you will see a Language option. Click on it
to proceed further.
Step 5: Now, we need to download the Hindi language. So, click on the
Add a preferred language option.
Step 6: Once you click on the Add a preferred language option, a
window will open displaying the name of the different languages
available. On the top of this window, you will find a search bar.
Step 7: Type “Hindi” in the search bar, as shown in the below
animation.
Step 8: The Hindi language will be displayed below the search bar.
Select it by clicking on it and then click on the Next button
displayed at the bottom.
Step 9: After clicking on the Next button, you will see a language
features window. At the bottom of this window, you will find an
install button. Click on the install button, and the Hindi language
will be downloaded to your computer.
Step 1: Click on the Windows logo in the bottom left corner of your
computer screen.
Step 2: After clicking on the Windows logo, you will see a gear-shaped
icon on the left side of your screen. Click on it to open the Settings
of your computer.
Step 3: Once the settings window is open, click on the Accounts option
to proceed further.
Step 4: After opening the Accounts window, click on the Family and
other users option.
Step 5: Now, if you want to create an account for your family or your
kids, click on Add a family member option. But, for now, we are
looking to create a new user account, so I will be clicking on the Add
someone else to this PC.
Step 6: Once you click on Add someone else to this PC option, a
Microsoft account window will open, asking you for the sign-in details
of the new user. If you have the details of the new user, then proceed
further by providing all the details. Otherwise, click on the I don’t
have this person’s sign-in information.
Step 7: Another window will open, asking you to create a new account.
You can easily create a new Microsoft account if you want. If you
don’t want to create a new account, click on Add a new user without a
Microsoft account and proceed further.
Step 8: Now, you will be asked the name & password of the new user.
You will also be asked some security questions. Fill in all the
required details and click on the Next button.
Step 9: Once you click on the Next button, you will see that a new
local user account is created successfully.
Languages used in our website
Source: Github
79.6%
6%
14.4%